Maintenance & Preparation |
Home |
Below is a log of work carried out on Gothik in preparation for the trip. I wouldn't consider it an interesting read but some of you may find it useful.
Last updated Monday 22 May. Click here to jump to this weeks updates.
Saturday 25 March 2006
During the week I'd finished compiling a list of parts required for servicing
the engine and a list of those I would need to take on the trip as spare.
I'd calculated from my old log books the hours underway verses the hours
the engine was run. I was astounded to find that we'd run the engine for
nearly 40% of the time we'd spent underway! Of course this was not all
motoring but it did include far more battery charging than I could recall.
I made my mind up to purchase a digital regulator which will hopefully
reduce the time it takes to charge the batteries.
My estimate for engine hours on the trip ran to nearly 300. After a pre-departure service that's at least 2 services mid-trip. Servicing the Yanmar 2GM-20 is not such a difficult job. The parts and some spares were readily available here in Brightlingsea from French Marine, the cost slightly in excess of £200.
Today was the first weekend day where the outside temperature was warm enough to allow me to work on the boat in reasonable comfort. My favoured way to gain confidence in the seaworthiness of any boat is to start work from the bottom up. This meant opening up all the nooks and crannies and washing down all interior surfaces of the hull with the intention of painting them. Since most of the pipe work, wiring and all the sea-cocks are in these nooks and crannies, several tasks can be combined in a methodical manner. It didn't take me too long before finding hose clamps that needed replacing plus pipes and cables that needed re-fastening and re-routing.
Filling the water tanks after a long day caused two headaches. When filling the forward tank I discovered a leak from a split hose. When filling the aft tank I lost the hose nozzle down the filling pipe - nowhere in sight, even with a torch. A few expletives and that was it for the day. Time for a pint in the 'Yachtsmans' with Phil from down the road.
Sunday 26 March 2006
This morning I finally placed an order through Yachtbits
for the Mikuni diesel 3.5kW heater and for several electrical items including
a new autopilot and a fixed DSC VHF Radio to replace my old non-DSC set.
Did some research last night to find a suitable digital regulator and
have opted for one from Sterling Power Products. Also decided to buy a
charge splitting diode since the voltage drop associated with these would
be compensated for by the new regulator. Went the whole hog and ordered
Sterling's Charge Control Panel to monitor what should be a considerable
improvement over my current setup. Expensive morning.
Spent the rest of the day fixing the forward water tank and extracting the hose nozzle from the water filling pipe. Blimey - how did I lose this? It was so jammed in there.
Monday 27 March 2006
Back to the day job - feeling very bruised, aching all over from climbing
in those bilges.
Thursday 30 March 2006
It was nice to see my uncle this evening. He will be accompanying me for
the entire trip - his enthusiasm was evident. Picked up a parcel from
my neighbours - most of my Yachtbits order.
Friday 31 March 2006
Another parcel from Yachtbits.
Saturday 01 April 2006
There are not too many comforts on a 27 year old 29 footer. After determining
a while ago that the state of the headlining was such that only replacement
made sense, today was the day to measure the job up and get the order
in for the tools and materials. In Colchester there was an auction of
the entire stock of a chandler recently gone into receivership. Wisely
I decided not to pay any attention to this as the measuring took most
of the day.
Sunday 02 April 2006
Finished estimating the headlining job. Aside from the time it would involve
(preparation was at least a week) it would also reduce my budget by an
unacceptable amount. This was a depressing fact. I really had hoped that
the three and a half month voyage would be spent in an environment to
be proud of and where I could reflect on a job well done. The reality
is going to be somewhat different. Old headlining not only starts to droop
but it takes on a musty mildewy smell as moisture gets behind the foam
backing... Nice! Note to crew signed up for the trip: be warned!
Cosmetically Gothik is in a bad way. Her appearance has not been helped by being laid up for more than a year and especially from being in a yard next to an exporter of scrap metal. The cloud of iron filings billowing her way has tainted every exterior surface. While it should be possible to reverse this it just adds to the list of many jobs.
Spent the rest of the day removing the aft water tank and preparing the stern locker for painting.
Monday 03 April 2006
The Mikuni heater arrived today. In a big box. While I was at work my
neighbour was gracious enough to accept it from the courier. Jan &
Mickey are truly wonderful neighbours, for their sake though this really
must be the last mail order item. The boxes arriving at my door have been
steadily getting bigger and bigger. This one beats them all - hands down.
It was all I could do to back it out of their door. It's been standing
in the middle of their living room for the best part of the day. I doubt
if it would fit anywhere else. After an uncomfortable number of apologies
and thank you's it now sits in mine. This in itself is enough to make
me get the boat ready enough to install it ASAP.
Bought two domestic batteries and one starter battery. All three are 85Ah lead-acid batteries. Thanks to a recommendation from Geoff Skelton, another GK owner, I got these for £35 each from Camping & General complete with 2 year warranty. The decision to use lead-acid was down to the fact that these take more kindly to the fast charging offered by the digital regulator.
Finally finished compiling a list of all the charts I will require. Some list! Purchasing a chart plotter and all the electronic charts would be cheaper - but not half as rewarding. I'm a chart person and feel much happier with charts. I can never help thinking what would happen if all the electrics fail. No brainer decision. I'll stick with the charts. The biggest concern is where I'm going to store them all.
More time spent in the aft locker. Removed the manual bilge pump hose for replacement. This large diameter hose has a run of approximately 3.5m, the middle of which had developed a nasty kink. Surprising really, since this is high quality ribbed hose and is of the non-collapsible variety. The middle section runs in the engine room and I suspect it must have been oil damage that softened the wall of the hose.
Moved into the large area behind the engine. Replaced hose clamps on cockpit drains, doubled up hose clamps on exhaust. Also removed many old fittings that were no longer serving any purpose (cable clamps, glassed in bits of wood, screws etc.). Thoroughly familiar with this area now, I can see all fastenings for the through deck fittings plus the fastenings for the rudder hinge. I feel happier now I know how to access this lot. Jolly awkward, this is a difficult space to get into and requires a number of panels to be unscrewed in the quarter berth. Prepared area for painting.
Next job was the engine area. It was obvious the main anode was serving little purpose from the fact that only a single tiny wire with a suspect connection was attached to it. There were signs of leakage through the anode hull fitting so decided to remove it entirely ready for replacement. Now need to review the bonding circuit, judging by the look of things I doubt much thought has been given by previous owners as to what is connected to the anode.
Tried to remove the cooling water inlet seacock from the through-hull fitting. Instead of PTFE it was sealed with a soft guey black gunk - probably non-hardening mastic. In trying to remove the seacock the through-hull fitting rotated. Not great. No longer feeling confident about the through-hull I decided to remove this as well. Removal of this and the anode took me to the close of the day sporting many small cuts and bruises from crawling into the tight spaces.
Back in the engine area. Removed the water pump and alternator from the engine plus all cables. This is in preparation for servicing the engine but will also allow better access for painting engine bilges. The engine has suffered quite a bit of water damage. By the look of it, it looks to be more than one thing, a leaky thermostat gasket and a leak in the siphon-break. On dismantling the siphon-break the valve had become unseated from corrosion. It's a bronze fitting and so cleaned up nicely with wire wool, the valve rubber looked good but upon reassembly I could still blow through it. I suspect it will be fine with water instead of air but went to the chandler anyway to enquire about a replacement siphon-break. Shock - a new one, made from plastic, is nearly eighty quid! Decided to stick with what I've got and to keep an eye on it when on sea trials.
Degreased the engine and the engine room ready for painting. This took a long time. The surfaces are clean enough now for sanding but to guarantee the paint job I think I will have to repeat the degreasing exercise again.
That's it for the day, more dusted knuckles but finally a feeling that progress is being made.
Last day of work until I start my new job September and the very last day of work in IT. It was a strange set of feelings I had at the end of the day. I thought I would feel elated, however I was more thoughtful of the years of hard won knowledge and experience that were about to be discarded.
No strange feelings today! Straight onto the boat this morning bright and early. Since the engine was spotless but still needed another degreasing I planned to finish servicing it in the morning before heading into town in the afternoon with a long shopping list. The servicing was straightforward but for the thermostat - it was firmly stuck in it's housing with a fair amount of corrosion. The thermostat was clearly going to need replacing.
It was a frustrating afternoon. One of those where you drive from shop to shop looking for something that should be simple to find. The traffic was heavy and it took an age to get anywhere but it was a nice change to listen to weekday daytime radio. Each shop gave me a list of other shops to try. I was really getting to know the nooks and crannies of Colchester. A growing list of shops but not a shrinking shopping list.
Last on the list was a visit the timber merchant for some plywood. In fact this had been the first on the list but Thorogoods no longer sell plywood. They advised I pay a visit to CF Anderson on the Old London Road, Marks Tey. I struggled with the traffic to get there a few minutes before five. Odd place. I could see no-one, not a soul. One enters a foyer in the main office building where a sign instructs you to pick up the phone. The phone dialled reception who firmly told me they had shut up shop for the day, however they still put me through to sales. Got plenty of useful advice from a chatty salesman who didn't seem to mind my odd questions. Told to come back at 8 o'clock tomorrow morning. Left still having seen no-one.
Back at CF Andersons at 08:00 precisely. Place still deserted. Eventually found the service desk and placed an order. It was a long way from the service desk to the plywood shed. CF Andersons occupy a large site with an assortment of antiquated buildings separated by 'streets'. Waited nearly three quarters of an hour for my small order to be assembled but then I hadn't phoned my order through first. I didn't mind, it was a beautifully sunny morning and just right for milling around. The two chaps in the warehouse were very jolly and I even managed to get a hot bacon sarnie from the sandwich van doing its round.
Fabricated new engine room starboard side bulkhead for mounting heater.
Overfilled gearbox with oil. Not a good start to the day but easily rectified.
While measuring a panel I noted the weakness of the cockpit floor supports. Apparently this is a characteristic of the GK29. The cockpit floor has always felt a bit springy, nothing unsafe but the gel-coat exterior tends to suffer from hairline cracks. Some effort had obviously been made to shore up the cockpit floor from the underside but the job was some of the worst fibre-glassing I'd ever seen. Decided to try and make a better go at it.
Prepared the underside of the cockpit floor for new fibre-glass reinforcing. This was a nasty business. Sanding fibre-glass is never much fun but the awkwardness of lying in the engine room bilge with power tools above your head made it seriously grizzly.
Materials for job set me back another 70 quid.
Called on Phil for the last job of the day to help me lift the rudder so I could remove the mounting bolts. These pass through the hull below the waterline and there was some evidence of an ingress of water. I was also a little uncomfortable about the fact that the rudder fixings showed no signs of being connected to an anode.
Cleaned up all rudder fixings. Boy, am I glad I removed the rudder. While there was still plenty of strength left in the fastenings it was obvious that these had suffered quite badly from not being electrically bonded. Some of the stainless steel bolts were eaten half through. I doubt these had been removed since the boat was built.
The inside mounting was not a flat surface. It being awkward to get to, the surface was very roughly fabricated. Consequently the bolt washers (4cm in diameter) had warped considerably. I applied high-density filler to inside rudder mount to flatten off the surface ready for glassing with fibre-glass tape.
Easter Sunday - day off.
Got web site up and running.
Prepared mast for lifting out. This was an enjoyable job for a change. Outside, on deck, with a tool bag consisting of pliers and screwdrivers etc. instead of inside, in a tiny space, with breathing mask and power tools. Excessively labeled everything.
 Mast
was lifted by Morgan
Marine. Rick & John were only 45 minutes late and did an excellent
job - Rick driving the crane, John tending to the rigging. I have really
begun to like the service Morgan Marine offer. It may be a little frustrating
in that you can never feel confident something's going to happen when
it has been said it will happen - but everyone is on your side, they really
work for you.
Mast
was lifted by Morgan
Marine. Rick & John were only 45 minutes late and did an excellent
job - Rick driving the crane, John tending to the rigging. I have really
begun to like the service Morgan Marine offer. It may be a little frustrating
in that you can never feel confident something's going to happen when
it has been said it will happen - but everyone is on your side, they really
work for you.
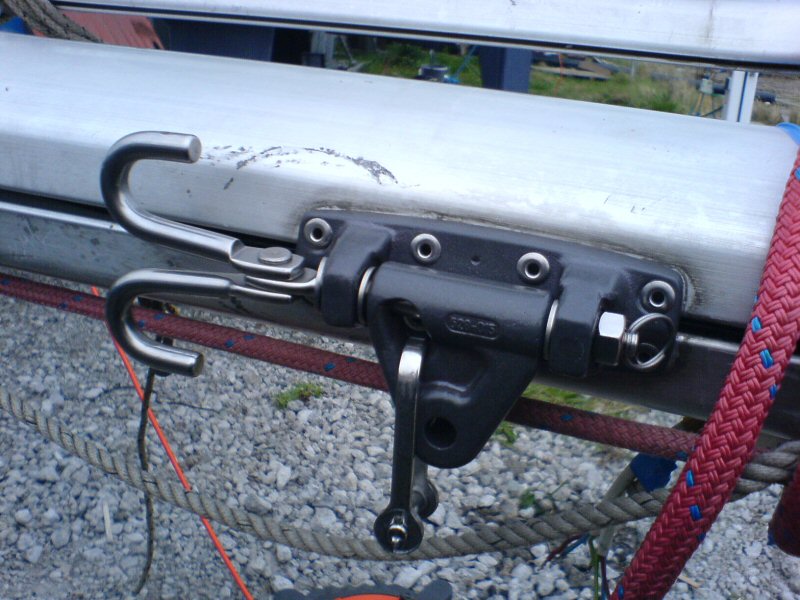
With the mast lying trestled across the ground I unattached all standing rigging (further excessive labeling), dismantled the roller furling, checked all fittings and finally drilled out the pop-rivets on the goose-neck. The goose-neck is severely worn and will need replacing. This worried me a little - I hope I can find a replacement.
Headed off this evening to join a friend of mine in Suffolk for dinner - ready for a trip to Z-Spars in Hadleigh in the morning to drop off the old rigging for renewal.
Up bright and early. On Z-Spars doorstep at 07:45 and they were open! Craig dealt with my requests. Another fine bunch of people willing to pull out all stops to provide a good service. Craig didn't flinch when I showed him what I thought was an antiquated and discontinued goose-neck. He recognised the fitting as one from a Kemp mast, said they don't stock these but told me that Fox's Masts and Rigging in Ipswich would almost certainly stock it. Next stop was Fox's.
 Yes!
They stocked it. Spent a very pleasant five minutes in conversation with
the receptionist while my order was made up. She was a darling. Fox's
provide every specialist service you could imagine for the yachtsman,
for large and small boats. I even managed to buy that most elusive of
tools; a pop-riviter that will handle 7mm pop-rivets! It cost me an arm
and a leg but the purchase price will almost certainly be recovered on
its first use. It will also be comforting to have on a three and a half
month trip.
Yes!
They stocked it. Spent a very pleasant five minutes in conversation with
the receptionist while my order was made up. She was a darling. Fox's
provide every specialist service you could imagine for the yachtsman,
for large and small boats. I even managed to buy that most elusive of
tools; a pop-riviter that will handle 7mm pop-rivets! It cost me an arm
and a leg but the purchase price will almost certainly be recovered on
its first use. It will also be comforting to have on a three and a half
month trip.
The afternoon was spent glassing the underside of the cockpit floor. A thankless task, one that found me regularly swearing as I wedged myself uncomfortably in the bilge with resin dripping on my face. For those that know me swearing is something I really don't do - so you can take my word for it, this was a nasty job! Underestimated the amount of resin required so will continue with this tomorrow.
Finished off the day in the evening fresh air attaching the new goose-neck to the mast. A rewarding finish to the day - the new pop-riviter made it a doddle.
Had enormous trouble getting started today. The idea of continuing with the cockpit floor really made me procrastinate. I thought I'd warm up to the task by finishing off the inside surface of the lower rudder mounting. For this I mixed epoxy with high-density filler powder and spread it over the area where the mounting bolts enter the hull. I then pressed a sheet of polished perspex over the filler and left it to harden.
The chandlers had run out of large cans of polyester resin so I made enquiries at the local boat builders to see if they would sell me some. Bargain! 5l of resin, plus catalyst, plus pots and brushes left me change from a £20 note.
Sailspar had come up with a quote for a new fuel tank. I don't know what it is with Sailspar, it may be they are just very busy but I never get the feeling that they are very enthusiastic for your custom. It feels like you have to get them to like you before they will do anything for you, hassle them and they will become awkward. If I didn't need their services I would have turned elsewhere (as I did with the rigging), but I persisted, I encouraged them and tried to get them to like me (awful!). Anyhow, I got the quote, the quote was reasonable but the completion date was a little too far away. I laboured the point in as soft a manner as I could and got assurance that the work would be complete in 2 weeks. I just hope it is.
Spent the rest of the day under the cockpit floor once more. For some reason my glassing was just not up to the standard it was yesterday. Felt very down about this. My efforts were 200% better than what was there before but I was just not sure it would suffice. I really wanted to nail this one once and for all. Instead I decided that the work I'd done so far would have to do for the trip but that I would not paint the new fibreglass in case I would have to revisit this next year.
Chiseled away rough edges from the glassing work carried out yesterday. Still thought it best not to stand in the cockpit in order to give it the best chance to cure. I removed the perspex sheet from the rudder mounting. A wonderfully flat surface. Drilled new bolt holes and tested the fitting of the rudder mount - absolutely perfect!
Finished shaping the engine room starboard bulk head panels (plywood) so that they will be ready for fitting. Also fabricated a number of deck fitting backing panels. Applied a coat of polyester resin to all new plywood.
Labeled and disconnected all electrical cables inside the engine room and transom. All of these cables were laying loose in the bilges. The length of the cable runs and the fact that that they were not clamped to anything had caused a lot of strain at their terminals. It would not have been long before these would have broken.
All but two of my large scale charts arrived today (through Morgan Marine). Charts really do it for me! The Admiralty standard navigation charts (SNC's) have all corrections applied up to the date of purchase so they are ready to use. Some of the Scottish SNC charts (being printed more than 20 years ago) have a wonderful 'slightly-used' appearance, one can imagine them being pulled from their stock-room shelf from time to time to be updated by hand. I'd had them a little more than two hours before I managed to spoil the edge of one with red wine. It made me feel like I'd sworn in church.
Awoke this morning to rain. Slightly puzzled as there was no rain forecast today. Slightly frustrated as many of the jobs were woodworking (with power tools outside) and epoxying, neither suited to a rainy day. Went to the boat anyway to plan the building of the new battery boxes. It was still raining late afternoon so decided to pop into Colchester to pick up wooden battens for constructing the battery boxes and a reel of cable for new electrical installations.
I was stunned that Colchester seemed so empty of traffic. B&Q was also empty - bonus I thought. Then across the loud speakers came the announcement that the shop was now closing. Odd. It wasn't until I got to the checkout that realised what day it was - it was Sunday!! The whole day I'd been thinking it was Saturday. I'd been planning to take Sunday off so was now not too upset that I'd not got a days work done. However, made more nervous because it is one day closer to launch date... too many jobs, just too many jobs.
Had to work fast today. I'd an appointment in the afternoon with the bank so would have to stop at 14:00.
Removed the old autopilot power socket through-deck fitting as the new autopilot (same model, Autohelm 2000) has a different socket. Also removed some unused deck fittings. Took an inventory of all navigation light bulbs and purchased spares. Fitted the new engine room bulkheads. By two o'clock I was satisfied with the work I'd achieved. I was also encouraged by the firmness of the cockpit floor. Maybe my glassing on Friday was not in vain after all.
Received a phone call from Sailspar to say my tank was nearly ready (wow, I must have been congenial!) but that they were having trouble in getting a filler cap the same size as my old tank - could I "come and have a look?".
Popped into Sailspar at 07:30 to check filler cap dimensions. A couple of millimetres smaller in diameter but no cause for concern. I was truly grateful for this kind of service.
It was a very damp and cool morning, not one for painting or mixing resin so turned my attention to the companionway ladder. Several screws had worked loose in the sliding latches that kept the ladder in place. When I tried to remove the remaining screws at the end of last season all the heads broke off. Ugh, brass screws - no place for brass screws on a boat - the zinc content is too high. The zinc component of the brass alloy corrodes (through galvanic action with the copper) leaving a very weak fastening.
The problem now was how to remove the many screw shafts. I opted for a plug-cutter type drill bit. In actual fact I used a 10mm diamond tipped hole cutter meant for cutting through stone and tiles. By no means ideal for wood but after a little practice I found I could cut a perfect 10mm diameter hole that could then be plugged with a standard 10mm teak plug found on chandlers shelves. It was a long process, the diamond tipped drill bit meant it was like cutting a hole with sandpaper. I would have to stop the drill every 3-5 seconds and wire brush the drill bit to remove the wood dust that would clog it - either that or start a fire. By the end of the morning I'd successfully drilled out all the old screws from the companionway.
The new autopilot socket was bothering me. It was not as good as the old one. The new one was made of hard plastic and had a screw cap to keep the water at bay when the autopilot was disconnected. However, the cap had no o-ring and was very fiddly to screw/un-screw. The old one was made of soft durable plastic, had an easy push-on/pull-off cap with o-ring and was totally waterproof. The problem though was the new socket had more pins than the old socket to take SeaTalk and NMEA signals. I had no intention of connecting the autopilot to my SeaTalk and NMEA devices so I decided to open up both old and new autopilots (Autohelm 2000) and swap over the cables and plugs.
It is a little unnerving opening up a brand new unit (and one that hopefully worked) and messing about with it but I'm glad I did. The new Autohelm had a burr of plastic breaking the seal of the watertight gasket. Fixed this, swapped over cables and put everything back together. Happy again.
To my delight the fuel tank was ready from Sailspar by 2 o'clock. Peter did the work, Derek orchestrated it - splendid effort guys. This has really helped me out a lot. If the tank did not arrive until two weeks hence it would have meant a lot of measuring and guess work when installing items in and around the fuel tank.
Received a delivery from Calor Marine. A new 'Magma' barbeque! Expensive item but on opening the box it was obvious why; quality - well designed and well constructed. One of those classic bits of American hardware, made to work and made to make your life easy.
Received another delivery, this time from Aladdin's Cave - Isotherm GE80 compressor and evaporator. This has been on my wish list for a while - the late decision to purchase was one of weighing up the budget (it's taking a pounding) and assessing my level of enjoyment in the things I keep in the fridge at home (very high). I can do without white wine (won't contemplate it if it's warm) I can't do without good food.
Chain locker door - refitted with wing-nuts! Not my first choice. It needs a proper door with a latch. However the wing-nuts beat the old method of screwing a board with slot headed screws over the access hole in the forward cabin! I can just imagine trying to drop the hook in a hurry - the chain jams which necessitates someone lying on their belly on the forward bunk, in wet weather gear, trying to connect the screwdriver to the screw in a bumpy anchorage...
Fabricated mounts out of plywood for the new fuel tank and tested fitting it. Looks good to me. Time to slip into the pub for a well earned pint. Derek from Sailspar was there. Had a good chit chat but after two pints I was done.
Sealed plywood mounts for new fuel tank and epoxied in fixing bolts.
Glassed over old through deck fittings ready for applying gel-coat.
Created new mount on the inside of the hull (epoxy and high-density filler) for the anode.
Dismantled gas locker and external speaker box.
Washed down stern locker.
Washed down engine room.
Degreased engine.
Degreased and washed remaining bilges.
Ready for painting tomorrow.
Painted stern locker.
Painted inside the transom.
Painted engine room.
Painted all bilges (except for forward cabin).
Used 3l of International Danboline.
07:30 start, 21:00 finish! Have to repeat the whole lot tomorrow with a second coat.
Phil came over to the boat at 0730 this morning (on his day off!) and helped me fit some of the through-hull fittings, viz; the rudder mount, the main anode, the kingston cock (engine seawater inlet) and the speed-log. All fitted with Sikaflex.
The rest of the day was a repeat of yesterday. I gave an honest second coat to all surfaces painted yesterday, I skimped no area because of awkward access or because the first coat looked 'good enough'. It amazed me that I had not missed a patch yesterday, although I had missed a whole removable floor panel in the starboard locker. The panel was hiding in the forward cabin so I can be forgiven. It does mean the paint will have to come out again tomorrow as I can only put the first coat on this today.
It was not until late in the afternoon (after the Sikaflex had cured) that I realised that I'd set the speed-log fitting turned 90° out of correct alignment. It has a hole drilled through the top of the fitting (inside the boat) to take a retaining pin. The fitting should be set with this athwart ships so as the log, when inserted, can be accurately aligned with the direction of travel. Stupidly, I had forgotten this and set the through-hull so as the pin would be easy to remove! There is absolutely no chance now of removing the though-hull without damaging it. Once Sikaflex has cured, it really has cured. Not enough expletives.
As expected for the second coat, I used approximately 20% less paint today.
Put a second coat on the last remaining floor panel for the cockpit locker. This phase of painting now complete.
Enquired in the chandlery at Morgan Marine about a new through-hull fitting for the speed log. It does not exactly look hopeful at this stage that I will be able to replace the old one like for like. Apparently these through hulls are all but a standard size. Internal and external hole diameters vary widely across manufacturers and even within a manufacturer's own model range. The speed log I have is an Autohelm ST30 bi-data (combined with a depth transducer) - a model no longer available. After taking precise measurements of the existing one Charles promised to do his best to find a replacement. This I know he will do, he's handled all my other awkward requests with diligence and patience. If the worst comes to the worst I can modify the existing through-hull in situ but it will be a difficult and time consuming task.
Purchased new fastenings and hoses to refit the aft water tank. Looking at the tank now it looks tiny. It took a while to work out exactly how to slot it into its home beneath the cockpit locker floor. There is only one way to do this. I remember using no force to remove it but reversing the procedure was surprisingly difficult. Ran out of time before managing to secure the tank and reconnect the hoses. Will have to finish this tomorrow - there goes my day off!
Started late (10:00) and finished early (16:00) but it took me nearly all this time to reinstall the water tank. There were a number of complications, mainly to do with access to jubilee clips etc. Made some improvements here so it should be easier for the next person.
I thought I'd managed to put the bilge paint away for this season, but no. Reconnecting the water tank meant removing drawers from the galley and groping around at floor height under the galley sink - it was here I noticed the grubby unpainted bilge. Cut new drainage holes from here into engine room bilge and cleaned the area ready for painting tomorrow.
100m of 14m eight plait anchor warp arrived at the chandlery for me. 50m for the working anchor and 50m for the second anchor. It's not often you buy 100m of anything, the price tag was a bit of a shock!
Woke up to persistent rain and blustery wind. Spent the morning at home.
By the afternoon it had stopped so manage to paint the bilge under the galley units. This is a vast improvement. With a brilliant white bilge, the galley sink sea-cock no longer gets lost in the gloom - you can locate it by sight! Will have to second coat this tomorrow.
Fitted the autopilot mounting bracket. Re-routed the power cables for the autopilot.
Second coat of paint to galley bilge.
Rewired engine room and aft section of the boat. This included electrically bonding the anode to the rigging, pushpit and fuel tank.
Replaced all fresh water hoses in galley. Testing revealed a leak in the water pump - dismantled the pump again. A reduction sleeve on one of the outlet nozzles had a small crack. Managed to fix this but will not know if the fix worked until tomorrow and the adhesive is dry. It will be a replacement pump if it is not good.
Charles from the chandlery called with the disappointing news that Autohelm (now Raymarine) cannot supply just the through-hull fitting for the speed log. Instead they have to supply the through-hull with a new transducer - £120!! Charles apologised having done all he could, he mentioned that Raymarine's after sales service is one of the worst in the industry. He begrudges having to deal with them.
Fitted the new fuel tank. I don't know why but I'm especially pleased with this job. It fits like a dream, makes use of much 'dead space' that was left by the original tank and it is comforting to know that the tank is not full of debris. When we had the boat surveyed the surveyor was surprised to find that the original fuel tank (suspected to be stainless steel) was coated in fibreglass. On removing the original tank I could hear lots of debris sloshing around inside. It turned out the tank was made of mild steel (hence a protective fibreglass coating) and probably full of rust. No wonder the primary fuel filter was black!
Pleased with the amount of work done today but worried about the rate of progress. It's less than three weeks to our departure date and I'm keen to sail Gothik locally for a good few days to iron out any teething troubles. I've turned a lot of stones but my nature makes it difficult to put them back if there is any sign of potential trouble - however small.
Had a look at speed log through-hull with a view to modifying this in place. It is in too tight a corner to drill new holes for the guide pin. When pondering over this last night I thought I may be able to heat up a piece of metal tube (e.g. copper fuel pipe) and melt a pair of holes in the nylon fitting perpendicular to the existing ones. The amount of room available, even for this method, would be fine for the first hole but not the second. Hmmm, on to the next task while I think further...
Filled the aft water tank and tested for leaks; none. Tested water pump in galley; it works a treat! No leaks and I feel very comfortable with the quality of the fix.
Fitted the hose to the manual bilge pump (mounted in the cockpit) and routed the hose through the engine room.
Shaped and re-routed the fuel-out and fuel-return pipes and connected them to the new fuel tank.
It was now early afternoon and I still had no ideas about how to modify the speed log through-hull. It was a beautiful day outside of the bilges and engine room so decided to tackle the mast...
 Replaced
the spreader flood light. There was some sign of chafing on the cable
so replaced that also. The old cable was firmly stuck inside the mast,
I had to pull quite hard to get it moving and was worried it would snap.
But it didn't and I'm glad because that would have made the job of pulling
the new cable through a whole lot harder. As it happened the job went
quite smoothly. Replaced a few self tapping screws with monel pop-rivets.
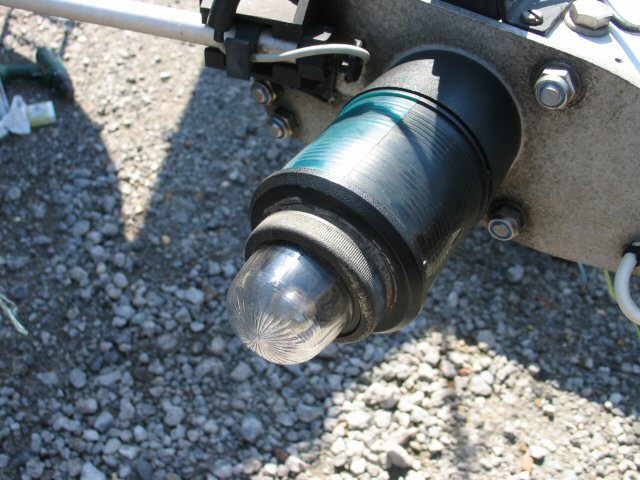
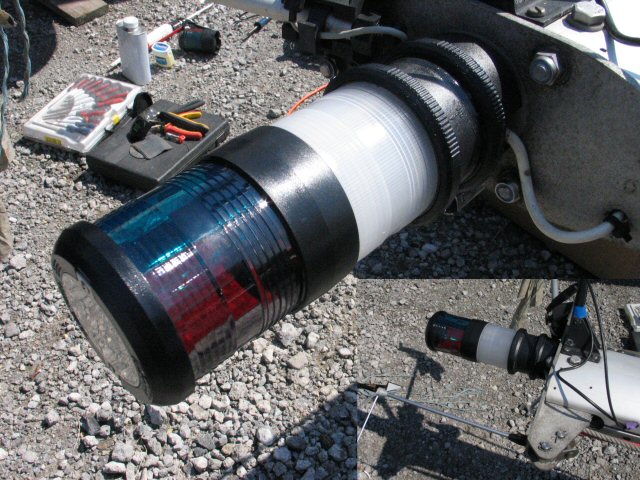
Serviced the steaming light, the anchor light and the tri-colour masthead
light. It was at this end of the mast (the top) that the cheque book need
to come out. Aside from needing a replacement 'Windex'
(nearly 50 quid) the tri-colour looked more like a BI-colour. The clear
white section was not only fogged but looked almost black. The red and
green sections were fine which was odd. Anyway, another £80 or so.
Replaced
the spreader flood light. There was some sign of chafing on the cable
so replaced that also. The old cable was firmly stuck inside the mast,
I had to pull quite hard to get it moving and was worried it would snap.
But it didn't and I'm glad because that would have made the job of pulling
the new cable through a whole lot harder. As it happened the job went
quite smoothly. Replaced a few self tapping screws with monel pop-rivets.
Serviced the steaming light, the anchor light and the tri-colour masthead
light. It was at this end of the mast (the top) that the cheque book need
to come out. Aside from needing a replacement 'Windex'
(nearly 50 quid) the tri-colour looked more like a BI-colour. The clear
white section was not only fogged but looked almost black. The red and
green sections were fine which was odd. Anyway, another £80 or so.
New tri-colour of the right size not in stock so left an order with Charles in the chandlery. Also broke down and ordered a new speed log transducer and through-hull because I'd still not come up with any bright ideas as to how I could modify the existing one.
Primed the galvanised surfaces on the engine to finish the day.
Felt happy with the work done but again a little deflated at how long it is taking!
Another fine day weather wise. Left home shortly after seven 'o clock and strolled down to the boat-yard. Final coat of primer on the engine and back outside to the mast. Sprayed the entire mast with WD40 and gave it a rub down. Finished here until the rigging arrives (tomorrow afternoon) and the new tri-colour. I'm must say really enjoying myself!
Since a new speed log through-hull had been ordered I thought I'd attempt the removal of the old one. This was going to be a big enough job as it was so before attempting to remove it I decided to have a go at modifying it. If I destroyed it in the process so be it. Found a pin of a suitable diameter and heated it with a blow torch until cherry red. Pushed it into place and hey-presto, a perfect job done. Had I really just spent £120 for a new one? Boulder-dash. I should have just gone for it yesterday. Oh well, I will have a spare log. Pained to have spent £120 though.
Next job was constructing some new battery boxes out of 12mm ply. I needed to make a level platform in an area of the bilge that had lots of compound curves. Nothing is square obviously so it took many fancy measurements before I could start cutting wood. The length of time I spent measuring paid off as all three new panels fitted with very little after-adjustment. One more panel to go. Finished measuring this ready for cutting but the cutting will have to wait 'till the morrow. Off now to fit a cat-flap in the door my good friend Fiona who has kindly offered to look after my cat while I'm away.
This mornings job was to finish painting the engine. The engine had already been degreased with International Super Cleaner but I still gave it a quick rub down with a rag damp with acetone. The top coats were to be sprayed so spent more than an hour masking everything I didn't want painted with sheets of plastic and masking tape. This was everything from engine tables and oil filler caps to engine room floor and walls. The spraying took about 5 or 10 minutes in total - this was for all three coats (four in some places) - each thin coat was applied after the previous had gone tacky.
In between coats I carried on with the last panel for the battery box. It took a while to transcribe all my measurements to the plywood and a deal of courage to trust the measurements I'd taken the day before - but it looked right. Cut the piece with the jig-saw and went to fit it. Three sides were fine, the remaining was oversized and would have to be trimmed down. I'd planned it to be a little oversized since this was a curved and chamfered edge. My palm sized hand plane (big palms) was perfect for this, the blade was razor sharp and trimmed very fine in the plane so that it would shave plywood edges without snagging. However, my oversizing was a bit too oversized. It took a lot of planing and a big pile of wood shavings but it was good fit by the end of it. I wanted to finish the boxes with glass and polyester resin and a couple of coats of paint to resist acid splashes but time has made me reconsider. The previous installation had no such graces. I shall leave this one for the moment and think about it further.
Removed all masking from the engine. It now looks like I have a brand new engine - it really does.
Phil arrived to help me hang the rudder. The rudder is very large and extremely heavy, it takes two to lift it (amazing that it floats). Rigged up a boom in the cockpit with a block and tackle extending over the transom and hoisted the rudder into position. Knocked in the pin and tightened the lock nuts on the retaining collar. This took the best part of two hours but it was a good to work with another hand and in the sunshine too.
Craig from Z-Spars dropped off the rigging. This was handy and a nice touch to their service. Craig lives in Brightlingsea so he brought it down on his way home from Hadleigh. It saved me a time consuming trip out of Brightlingsea.
Now started to plan the placement of some various new electrical components; digital regulator, charge splitting diode, power management meter plus its three 200A shunts. The shunts are not small items and since they have to be mounted with short cable runs between batteries, alternator and splitting diode, finding a good space to put them took some working out.
Assessed what was involved to install the fridge evaporator and compressor. Should not be too difficult to install but the trick is placing it where it will not interfere with the large diameter ducting hose from the heater (which is not yet installed).
Started off with a coat of paint on engine mounting blocks and mast support in cabin.
Next moved on to the task of putting some diesel in the fuel tank. The new tank had a slight reduction in the diameter of the filling pipe so needed a new funnel. The funnel I'd purchased just fitted snugly into the tank. Far too snugly - when pouring diesel not enough air was able to escape from the tank and it would take a long time for the funnel to drain. Worse; the air that was able to escape bubbled through the diesel entering the tank and caused large amounts of it to be spilled. All this was happening unobserved as I was concentrating on making sure neither the drain cock nor the fuel-out cock (at the base of the tank) were leaking. After putting 10 litres of diesel in the tank I estimated a quarter of a litre (a large wine glass) had missed. There seemed to be diesel running everywhere, down the sides of the tank onto the cockpit locker floor and into the bilges. All this on the pristinely white, newly painted surfaces.
It took about an hour to clean the mess up properly. This would have been far worse an ordeal if the cockpit locker was full of its usual equipment. In fact it did not even bear thinking about. The problem needed to be solved once and for all. Had a look at a few more funnels in the chandler. None of them looked like they would really let enough air out at the same time as letting the diesel in. Returned to look at my funnel and considered for a while adding a straw like pipe down the centre of it - too fiddly. Instead I cleaned the funnel (to remove all traces of diesel) and gently warmed the plastic spout with the blow torch until it was soft. It was then easy, with the shaft of a screwdriver, to make an indentation all along one side of the spout. Now to test it - placed the modified funnel into the tank filling pipe (snugly!) and proceeded to pour in another 10 litres of diesel. Not only did it not spill another drop but the rate of fill was such that I could not pour the fuel into the funnel fast enough! Very happy indeed.
 Next
job was reconnecting the engine to its various pipes and hoses (exhaust,
fuel, water) and reattaching it to its various components (water pump,
alternator). It was really raining very hard now outside but I was happy
inside with Radio 3 and my socket set and screwdrivers. Didn't manage
to finish all tasks on the engine. There is still the throttle, gear and
stop cables to connect, plus all the electrics (new battery cables to
be made up) and the fuel system to bleed. If I can get this all done tomorrow
and the engine started then I may have a pint in the pub.
Next
job was reconnecting the engine to its various pipes and hoses (exhaust,
fuel, water) and reattaching it to its various components (water pump,
alternator). It was really raining very hard now outside but I was happy
inside with Radio 3 and my socket set and screwdrivers. Didn't manage
to finish all tasks on the engine. There is still the throttle, gear and
stop cables to connect, plus all the electrics (new battery cables to
be made up) and the fuel system to bleed. If I can get this all done tomorrow
and the engine started then I may have a pint in the pub.
 Late
start today - it's Sunday, so 10 o' clock. Bled fuel system.
Late
start today - it's Sunday, so 10 o' clock. Bled fuel system.
Connected electrics - although did not get new battery cables made up. Thought I'd test the engine in its original configuration but with new battery to make sure all was well. Engine would not turn over since new battery needed a charge.
Drilled hole in transom with 40mm holesaw for the heater exhaust. The installation instructions said to use a 42mm holesaw. I'm glad I practiced cutting a hole in piece of plywood first - 42mm would have been far too big.
Had a pint in the Railway Tavern - then Phil and I discovered a back room with table football - had several more pints.
Felt a little worse for wear this morning but as soon as I'd got outside and on the boat all seemed to be fine. The battery was charged, so I primed the engine water pump, placed the inlet hose in a bucket of water and turned on the tap to keep the bucket topped up. Flicked over the compression levers on the cylinder heads to allow the engine to spin easily and then turned the key - it took a while for both cylinders to start firing (still air in the fuel) but when they did the engine was sounding sweet. Apart from the tachometer all seemed to be working. Took some voltage readings from the alternator - I'd modified the alternator a few weeks ago adding a wire to the field coil so it could be connected to the new digital regulator - all working as expected.
Phil arrived to help prepare the underside for antifouling but it was pouring with rain. Instead we chatted as I proudly showed him the running engine. A quick slip on my part and the bare end of the field wire briefly touched the positive terminal on the battery. Not so good. That put an end to my efforts. No longer was the alternator doing its job. I'd blown it, or something. A few more checks confirmed I was now alternatorless. Ah! Really very bad indeed. A new alternator is £350.
Removed the alternator and sheepishly took it to French Marine Motors to see what could be done. They were hopeful they could test it and supply what was needed to fix it - their hunch was that it may only cost £60. That was a shade better than £350 but still not a good morning.
Since it was raining Phil kindly offered to run into Colchester and pick up some necessaries from B&Q. This would save me a good couple of hours while I concentrated on installing the diesel heater. Made a lot of progress on this today. Managed to install the main unit and route the exhaust hose and silencer. I was a bit disappointed that there was not enough lagging supplied for the exhaust hose. Will have to purchase some more of this and finish the job tomorrow.
Chandlery not open yet so started work on connecting the fuel system for the diesel heater. Parts supplied do not tally with the installation instructions - missing a 3/16" fuel cock, a 1/4" to 3/16" reducer and two brass olives. Getting a little narked about this heater. Aside from the missing items the installation instructions are far from clear.
Phil arrived and we fitted the heater exhaust through-hull with Sikkaflex 291. Phil then started sanding the antifoul on the underside while I drew up a shopping list of things to be purchased from the chandlers. This included the missing items for the heater, more exhaust lagging and all the cabling and terminals required to connect the Sterling Power Management system and the digital regulator. Managed to obtain everything from French Marine Motors except for a 3/16" fuel cock. They ordered one for me but it won't be here until Thursday.
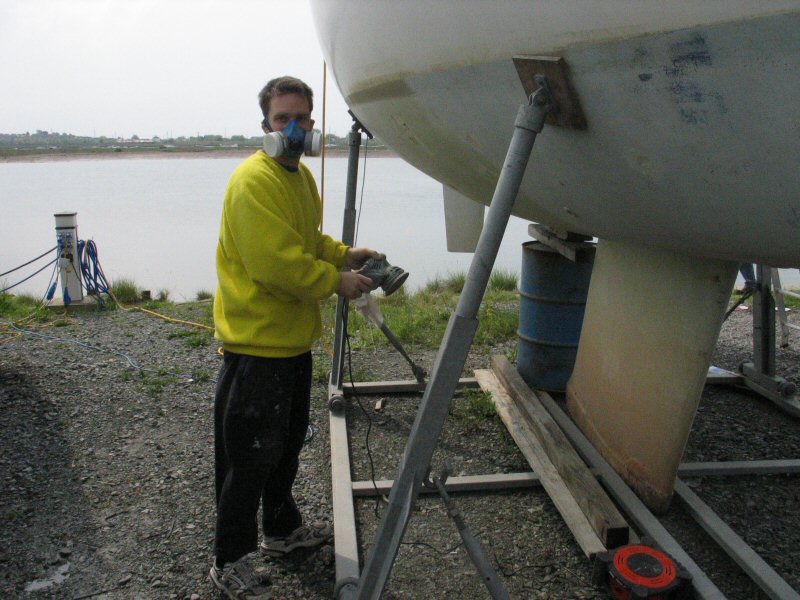 By
early afternoon Phil had finished sanding the undersides. He'd done a
splendid job. Finally it looks like something has been done to the boat.
From casual observation, everything I've done on the boat is invisible!
Phil trundled off home and I spent the rest of the afternoon completing
the fuel pipes (bar the fuel cock).
By
early afternoon Phil had finished sanding the undersides. He'd done a
splendid job. Finally it looks like something has been done to the boat.
From casual observation, everything I've done on the boat is invisible!
Phil trundled off home and I spent the rest of the afternoon completing
the fuel pipes (bar the fuel cock).
By early evening I'd finished the fuel system and lagged the exhaust, next was the heater wiring. Routed most cables but left the thermostat - it will be easier to see where these cables should be routed after installing the fridge compressor. Started on the fridge. I was beginning to flag around 8 o' clock and decided to call it a day...
One of those days where everything seemed to be a little more awkward than it needed. To start off with, the ideal location for the fridge compressor was in-line with the ducting run from the heater so I planned to position it above this. This placed it just under the ceiling of the engine room, i.e. the cockpit floor. In sunny weather (even on a cold day), or if the engine is running, the top 30cm of the engine room gets very warm indeed. Not a great location for the compressor so I decided to alter my plans mid-flow (not usually a good idea).
Next thought about locating it lower than the ducting run. Initially this seemed perfect - couldn't think why I hadn't thought of it before - until I realised it was close to the stern tube. If the stern tube develops even a small drip the turning prop shaft tends to throw it everywhere so the compressor can't go here either.
Went back to my early ideas of placing the compressor under the galley units, beyond the back of the drawers. I could get the compressor in this space but mounting it would be another thing altogether. The bulkhead was just out of reach. It was a shame - there is a lot of wasted space here - you would never see this much empty space on a modern boat. Without taking the galley apart there was nothing I could do - although it took me a while to convince myself.
I then started thinking, what about the other side of the galley bulkhead - the pipe and cable runs would be simple, the locker abaft the galley is well ventilated and easy to access. This is the locker where the aft water tank is situated, it is not strcitly a 'dry' locker since it is under some removeable floor panels in the cockpit locker but throughout my seasons use of the boat it has always remained dry and free from dust and dirt. It is an awkward space to store anything since it means removing most of the contents of the cockpit locker so was another little used space. It would save me hours of work...
Decided to go for it. After mounting the compressor bracket and drilling the hole for the cable and gas pipe I started to feel less comfortable with the idea. Why did I think this would be a better idea than my original plan? Well, now I was comitted - I'd almost finished the job. Instead I made some efforts to damp proof the compressor. I greased the mounting bracket and its quick release mechanisim, put Vaseline on all the electrical connections and gave a light spray of WD40 on the compressor and made a note to check the condition of the installation throughout the season.
Popped into French Marine Motors to get my battery and alternator cables made up. This took a long time - they were quite busy. Enquired about my alternator - yes it was fixed! My neighbour, Mickey, had taken it home. Mickey works here at French Marine and took upon himself to give it special attention.
Next job was mounting the evaporator plate in the cool box. This meant drilling some screw holes but none of my drills, including the hand drill, was small enough to get into the space. I needed a right angle drill.
Trip to Colchester. After trips to several shops all I could obtain was a small cordless screwdriver that took 'drill bits'. The drill bits were specially made for the drill and were included in the box. I could not use it with normal drill bits. Not the greatest bit of kit but it was cheap, it was all that was available and seemed fit for the purpose. Upon opening the box back on the boat there were only three sizes of drill bit - 2mm, 4mm and 5mmm. I needed a 3mm bit for the self tapping screws. The 2mm would not do since the coolbox wall was thick fibreglass - it would be like trying to screw in a self-tapping screw into too small a hole in a piece of steel. Tried the 2mm bit anyway but as guessed the hole was too small. Smaller screws would suffice but my screw box had nothing of the right size and since it was 7pm there would be none available until tomorrow.
Picked up the alternator from Mickey ready for installing first thing tomorrow.
Installed alternator, started the engine - all fine. Removed the alternator, soldered in the field wire and re-installed it. I would have re-tested but someone else is using the waterhose. Can't start the engine without this so bought the fastenings for the fridge evaporator and picked up the new masthead light - £104!! Ouch. Also booked the launch date for Gothik - next Wednesday. Mast will go up before then but no date specified.
 It
was a glorious sunny day so I spent the next couple of hours outside mounting
the masthead light. This was relatively straightforward but it did mean
drilling and tapping new bolt holes. The whole unit was a lot taller than
the old one - the Windex only just clears it.
It
was a glorious sunny day so I spent the next couple of hours outside mounting
the masthead light. This was relatively straightforward but it did mean
drilling and tapping new bolt holes. The whole unit was a lot taller than
the old one - the Windex only just clears it.
Back inside and back to the fridge. It took another couple of hours to finish installing the evaporator and the thermostat. What a task - it meant trying to get my head in the fridge, both hands and the drill at the same time as balancing precariously on one leg. Routed the gas pipes and cables into the insulation and fabricated an inspection cover from plywood - this was all under the galley sink at the back of the drawer unit and no easier to access. Fridge more or less complete now. Just the power cables to connect. This will be easier to do at the same time as connecting the power to the heater as it involves installing a new fuse box in the battery compartment.
Received a phone call from Morgan Marine - my genoa halyard is ready to pick up. This has taken nearly two weeks for a rope to wire splice. Not too happy with it to be honest - the wire splce is fine but the wire is about 8cm longer than the original. This in itself may be okay but the length of the eye and crimp is 2-3cm longer than the original. This will mean an effective loss of 2-3cm on the luff tension. It will remain to be seen if the genoa luff can be tensioned sufficiently. I seem to recall having difficulty getting enough tension before.
3/16" fuel cock (for the heater) had arrived at French Marine. Picked this up. Dinky little thing.
Onto the heater once more. Completed most of the cable runs, power cables have now been routed as far as the battery compartment, thermostat cables as far as the galley. Cut several holes for the 80mm ducting hose. Time now is 21:30 and I've run out of steam. See you in the morning.
Measured old halyards. Got roller furling and headstay ready to go. Purchased new halyards for old. Removed the old from mast and ran the new new through it. Discovered a bird's nest inside the mast. This took an age to remove, piece by piece. I had to teaze it out with a pair of screwdirvers and a 'grab' tool - a little claw that can be opened by depressing a button on the end of a flexible metal tube. Although the nest looked recent, as far as I could tell there was nothing in it.
Revisited the battery compartment. I had built a new box for the domestic batteries some time ago but had left the fastenings in the hope I would get time to paint. No hope for that now - I need to finish off the wiring in this area. Bolted and screwed the battery box so it is firmly fixed and part of the boat. Wandered over to Sailspar to purchase some studding and metal strapping. The studding and strapping was to clamp the batteries into the box. I sawed the studding into three equal lengths (a little taller than the batteries) and installed them so they protrude vertically from the base of the box. The batteries fit between the studs. A metal strap fits over the top and the whole lot is screwed down with wing nuts. The batteries now become part of the boat.
On the boat very early this morning - ten past six to be precise (I was looking forward to finishing earlier this evening to visit friends and to take my cat to her new home for the time I'm away). Before getting out of the house I could hear thunder. On the walk down the road to the boat I could see the strikes, they were terrific. By the time I got to the boat the first heavy drops had started and I settled inside listening to the downpour.
Started work to complete the wiring. There was a large amount of cabling to install for the Power Meter, three shunts (for the power meter), the charge splitting diode, a fuse box (for items that don't get switched off at the panel), a negative bus bar and a simple on/off switch for the domestic batteries. There were also the connections of; the alternator to the digital regulator, the power meter to its shunts, the fridge to the power supply and the heater to the power supply. This was a nice job. I had planned the installation yesterday and drawn up the wiring diagram. I had all the bits I needed; colour coded cables, cable ties, crimp connectors, etc., etc., so it was a bit like constructing something out of Mecano.
Phil's father-in-law, Keith, popped over to the boat just before lunch. He is crewing on the first leg so we had a brief chat about things.
Both Keith and Phil came over to the boat after lunch to scrub the boat and remove 18 months of yard dirt and grime. Phil brought his pressure washer and I supplied them with four bottles of Easy Clean fibreglass cleaner. This is oxalic acid and should remove the rust stains caused by the iron filings that blow over from the scrap exporters next to the yard. It should also cut through most of the grime.
Well, the difference was remarkable. Gothik looks like a different boat. Their efforts had really lifted my mood. Gothik's appearance beforehand was shameful. Now it is different altogether. While Keith nad Phil were scrubbing I was able to complete the all the tasks I had set myself today. The final task of turning on the battery switch and testing the fridge was a good one. The power meter also sprang into life and a cursory glance showed that everything appeared to be working fine. It's seven o'clock. Not a bad day at all.
Yes - it was a bad day, or at least a bad evening. I'd had my car next to the boat but the yard manager had locked the gates to the yard. I could not drive the car out - it was locked in. Normally this does not pose a problem but it ruined my plans for the evening. Suppered with Phil, Katie and Katie's parents. Fish and chips.
Write ups are probably going to be a little brief for the next few days at least - it's getting close to launch.
Dropped in the engine battery and started the engine to test the charging systems and the power management meter for the engine side of the electrics. Not working. Double checked everything; my wiring against my diagrams and the regulator/power-meter diagrams. Nothing appeared to be amiss so got the volt meter out and conducted some tests with and without the engine running. The digital regulator would kick into life as the ignition key was turned on but would immediately trip with the high 'battery voltage' light illuminated. Sure enough, testing the voltage across the regulator sense terminal and the negative on the alternator it was around 25 volts. It took a while to figure out but I had simply ommited connecting a common ground between the domestic and engine batteries. Not on my wiring diagram! Strangely, not on the wiring diagrams for the newly installed equipment. They must have thought it obvious.
Phil came over and put the first coat of antifoul on. First coat took just over 2.5l (at £87 for a 2.5l tin).
It was good to get the wiring completely finished. Now to completely finish the heater. This was just a straightforward task - I'd done all the planning and most of the difficult-to-access stuff - but it was time consuming. I was determined to stay until I'd got the heater up and running. When finally things were ready, followed the first time start up procedure from the manual for bleeding the fuel system. Things seemed to go according to the book. Now the final moment, switched it on and waited. There is about a 40 second delay as the glow plug comes on and the fule pump kicks into action, another 40 seconds (according to the book) before the heat finally starts being blown out. Well, well - time to celebrate. It seemed to be just fine. Left it running for an hour keeping an eye on things, especially the exhaust and fittings close by - it does get pretty hot.
Left the boat at 22:55. Too late for the pub, not that I fancied a pint - I was beat.
Fixed all the heater hoses in place now that I'd tested it had worked. Switched it on to give it the 2 hour minimum running in period. It was interesting watching the power consumption as the heater progressed through it's cycle. Alarmingly, 22 Amps were being drawn shortly after turining it on. I presume this was mostly the glow plug. The fan appears to consume about 4 to 5 Amps - quite a lot but it certainly pushes out the air.
Begun to tidy up the loose ends and little jobs that needing doing. Nothing really major left to do (thank goodness - 2 days to launch, 6 days to departure).
Picked my uncle up from the station early afternoon. Took him straight to the boat. He'd come all the way from Wales and now he was sanding and preparing the gas locker for painting!
Phil arrived early evening and started the last coat of antifoul while I dressed the mast with the rigging wires. It was good to be working with more than just myself. It felt strange but most welcome to have conversation.
Finished up with a few pints and more table football.
 Odd
job day today - finishing bits and pieces here and there, fitting panels.
Installed the inverter and the new DSC VHF radio. Keith carried on painting
and varnishing.
Odd
job day today - finishing bits and pieces here and there, fitting panels.
Installed the inverter and the new DSC VHF radio. Keith carried on painting
and varnishing.
Mast was stepped late in the afternoon. Nothing like leaving it to the last minute! Got very cold and started to rain so did some inside jobs and switched on the heater - I'm beginning to like this heater.
Headed home at the repsectable time of seven thirty.
Panic day today - the boat was going in the water - it was firmly booked for 15:30 with a tide dependant time. Did we feel ready and organised enough for this? NO!
Keith put a final coat of paint on a few items while I sorted all the items on the boat into piles of what comes with us and what gets left behind. These piles were nearly all tools and spare parts. Because I'd done so much work on the boat it was an easy task to know what tool or spare part should be brought and what should not - however, there were enough grey area items to make the task a slow one.
Once the sorting was done it was a matter of loading the car up, vacuuming the boat and stowing what was left. It then took several return car loads of cabin cushions, sails, fenders, outboard, cooker, charts and books, diesel, etc., etc.. The time was now approaching 15:30 very rapidly. Somehow (and all of a sudden) the boat just became shipshape. As I poked my head out of the companionway there was the travel-hoist.
The wind had been picking up over the last few hours and was now blowing hard with strong gusts - not a great time for Keith's first mooring along-side procedure and I must admit I was feeling a little rusty and a little nervous. No time for reflecting on this as we were now trundling down the slip and into the water. As we began to float, the wind abated and gentle rain started to fall - the warm front had arrived. The engine started without difficulty, the condition of the exhaust output was good. I slipped us into gear and noted the rate of the tide as we headed into deeper water.
Perfect. Aside from a little warm sunshine, the conditions could not have been much better for a first time mooring for Keith and a first time for me for 18 months. With nudged our way slowly into the gentle tidal stream and ferry glided into an ample sized berth with plenty of time to adjust fenders, prepare lines and step onto the pontoon. It was good to be back on the water! We pulled a beer from the fridge, sat down and congratulated ourselves.
 The
wind has picked up, it's now blowing force 6 with gusts of 7. The next
few days are to be the same. It is not looking good for a planned departure
on Sunday. We need to have a local sail before we go so as to test the
boat.
The
wind has picked up, it's now blowing force 6 with gusts of 7. The next
few days are to be the same. It is not looking good for a planned departure
on Sunday. We need to have a local sail before we go so as to test the
boat.
Spent the day doing more odd jobs. I really wanted to get the main and head sails up but there was just too much wind to consider doing this whilst tied to the dock. The idea was to get a good idea of the running tackle that needed to be replaced and then make a trip to Fox's in Ipswich to purchase it. The clutch on my car had been complaining and today it finally gave up. This was rough timing. I'm not sure now how we will do our last minute running around. A few days more and we wouldn't have needed a car for another three and a half months!
Not a great deal to report on today (not much maintenance going on). Managed to borrow a car to visit the chandlery in Ipswich. Shopped our way around Sainsbury 's supermarket picking up provisions. Carried all by dingy to Gothik on the pontoon. It was rough - force 9 in the 'Thames' forecast area - with the dingy almost full it made for an interesting ride across the 100m or so of water from the Brightlingsea public jetty.
Well folks, signing off the from daily updates to the 'Maintenance & Preparation' page. From now on you can read daily updates in the progress reports.